- Right-click on the newly created VM and select Power On
![]()
- For XenApp 6.x VMs, log in, and perform the following:
- Uninstall Citrix Tools for Virtual Machines
- Uninstall Provisioning Server target device software
- Uninstall XenApp via the command line

- Uninstall any remaining XenApp 6.5 specific features.
- Move the XenApp AD computer object to an OU that does not contain XenApp 6.5 specific policy settings
- Reboot when complete.
NOTE: If you have difficulty logging in via RDP after the uninstall of XenApp 6.5, try deleting and recreating the RDP-Tcp connection in Remote Desktop Host Configuration
- For XenDesktop 5.x VMs, log in, and perform the following:
- Uninstall Citrix Tools for Virtual Machines
- Uninstall Provisioning Server target device software
- Uninstall Citrix Virtual Desktop Agent
- Uninstall Citrix Virtual Desktop Agent Core Services
- Uninstall Personal vDisk
- Uninstall Citrix Profile Management and any remaining XenDesktop 5.6 specific features
- Reboot when complete
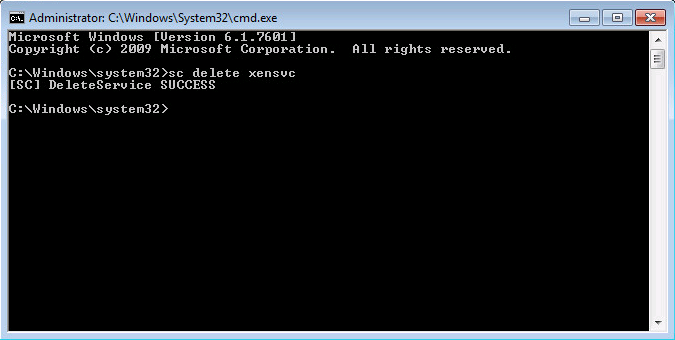
NOTE: After the uninstall is complete, check the services to ensure all Citrix related services are uninstalled from the system. You may need to manually remove using the sc delete command.
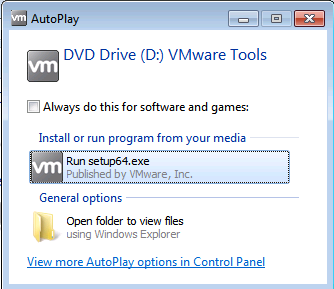
- After the VM has been rebooted, log in, and install VMware Tools. Select defaults and reboot when the install is completed.

- After the reboot, log in to the VM and perform the following:
- Disable IPv6 if enabled on the ethernet adapter
- For Windows 2008 R2 and Windows 7 SP1, install KB2550978, reboot when complete
- For Windows 2008 and Windows 7, install KB2344941, reboot when complete
- Install Provisioning Server Target Device software 7.1, uncheck Launch Imaging Wizard, click Finish and reboot when complete
- After the reboot, log in to the VM and perform the following to create the new VHD for Provisioning Server 7.1:
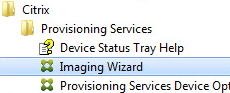
- Run the Imaging Wizard
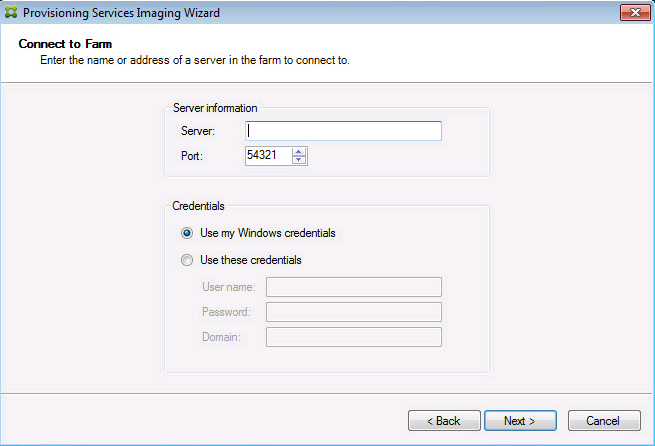
- Enter a Provisioning Server 7.1 IP or Hostname, click Next
- Select Create new vDisk, click Next
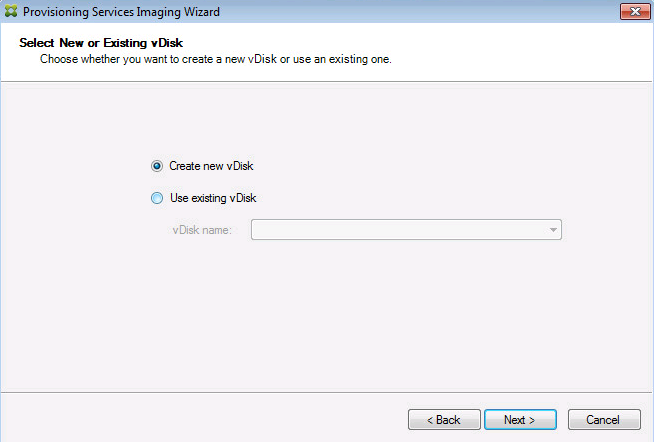
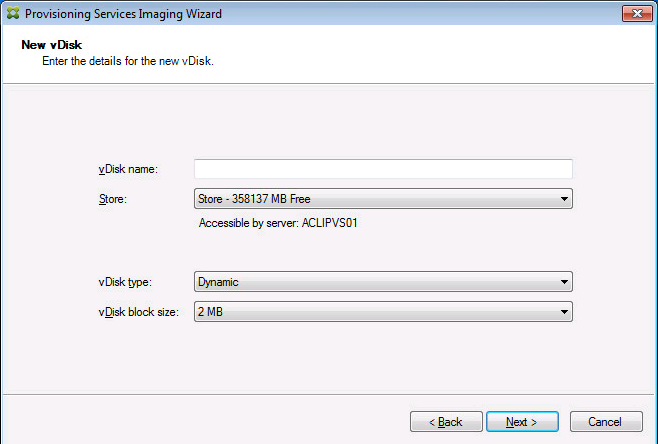
- Enter the info requested, click Next
- If you plan on using KMS or MAK activation, select that here and click Next

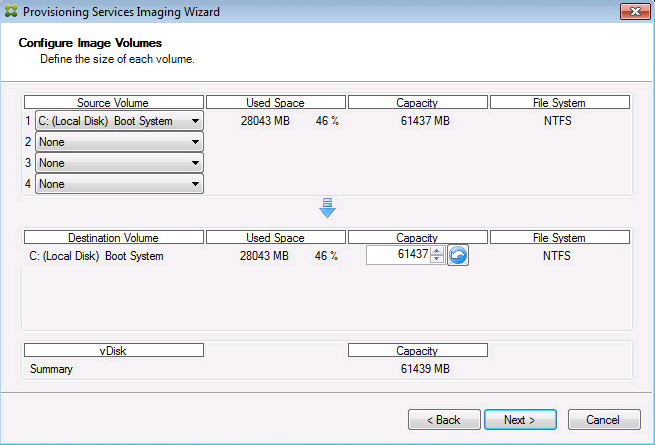
- Review/modify image volumes, click Next
- Enter the info requested, click Next

- Select Optimize for Provisioning Services, click Finish

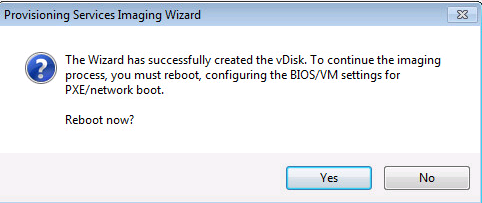
- If you receive this message, click No
NOTE: For our project, the Provisioning Server 7.1 environment was on the same subnet as the existing Provisioning Server 6.1 environment so we decided to use Boot Device Manager to create a Provisioning Server 7.1 boot ISO and boot this VM from CD. This allowed us to continue to use the same subnet but avoid causing disruptions to the Provisioning Server 6.1 environment. We also stopped and disabled the PXE service on the Provisioning Server 7.1 hosts.
- If you decided to create a Boot ISO, perform the following:
- Shutdown the VM
- Mount the boot ISO to the VM in vCenter
- Boot to the VMware BIOS
- Update the VM BIOs boot order to boot from CD-ROM
- Start the VM
- At login, the Provisioning Server Imaging Wizard should begin creating the VHD file from the existing VMDK

- If you are using a separate subnet for Provisioning Server 7.1, perform the following:
- Ensure your VM is on the same subnet as the Provisioning Server 7.1 host(s)
- Ensure the PXE services are started on the Provisioning Server 7.1 host(s)
- Shutdown the VM
- Boot the VM to the VMware BIOs
- Update the BIOs to boot from Network
- Reboot the VM
- At login, the Provisioning Server Imaging Wizard should begin creating the VHD file from the existing VMDK
- Once the image is created, shutdown the VM